Nearly 2 years ago now, I bought my Mighty Boy. Thanks to Hewball's help, a nice drive to go and collect it, as it was running, but unregistered, and still needing some work to get it ready to clear the pits.
The previous owner had pieced it together from two MB wrecks, and one Hatch. From him and wherever it had been before, it had copped a nasty sunbleaching and exposure that had stripped most of the clear, and the paint from roof and bonnet.
After I got it home, the car received a wash and a thorough going over with some rubbing compound to clean it up. I also cut out some rust from the front drain area, and welded in some sheet steel to build it up. The same treatment was needed around the door hinges, and the fuel filler cover inside the tray.
Some new tryes, replaced and fixed the brake fluid and lines, rough painted the roof and bonnet, and cleaning the sticker -plastered rear window took care of the cosmetics. I also gave the bumpers a sand and spray with black bumper paint.
The temp sender, handbrake sensor, new leads, replacing the battery mounts and replacing some dodgy wiring took care of the electrics.
I retrimmed the parcel shelf and refitted it undertook the messy task of removing what was once the foam roof lining, and replaced it with a single sheed of Dynamat, then trimmed Dynaliner to fit the room. That stuff makes an awesome difference.
After that it went across the pits, and I was driving it for 6 months daily.
{EDIT: Adding pics from when i got it.}
Breyten's neverending build
- Attachments
-
- Night before new tyres and passing the pits.
-
- Just a spray-over.
-
- Fixed up, sandwiched sheet steel. Gasless MIG and some injected filler.
-
- Cancer removal.
-
- Surgery required.
-
- Peel it back to see what's what.
-
- Cleaned up, but only skin-deep.
-
- Bit of a rub down.
-
- Picked up. Running, no rego. Not drivable.
Last edited by Breyten on Wed May 30, 2012 12:49 am, edited 1 time in total.
1987 Suzuki Mighty Boy - F5A, stocker.
Work fleet, or Wife's Jeep Rubicon.
Work fleet, or Wife's Jeep Rubicon.
After the 6 months of use, the engine was not running right, so I decided to try fixing it myself. I have the advantage of a company car, so I do not need the MB for daily use.
Since then I have gotten married, moved house, removed the engine, and tried a few other small tasks.
I have removed the vac control on the second throttle, replacing it with a mechanical link.
I needed to remove the engine, and ended up taking it to a workshop, as the crank puller bolt had been over torqued.
I have split the gearbox to inspect, and replaced the selector shaft seal.
I have removed the heater/ fan box.
I have stripper and reassembled the engine, cleaning and fixing a couple of leaks, as well as doing it all correctly. Which I did not have the luxury of knowing beforehand.
Also fitted some extractors I got from Hewball.
- Attachments
-
- Primed n puttied.
-
- Blasting. The only rust found.
-
- engine ready
-
- engine out
Last edited by Breyten on Wed May 30, 2012 10:16 pm, edited 1 time in total.
1987 Suzuki Mighty Boy - F5A, stocker.
Work fleet, or Wife's Jeep Rubicon.
Work fleet, or Wife's Jeep Rubicon.
This last week, in preparation for refitting the engine, i have been working on the engine bay.
It has been sandblasted back to bare metal to check and treat any corrosion. The only spot was under the battery tray.
So far I have done two coats of primer, and one coat of spray putty. .
The target is to have it as smooth as glass, then to give it two coats of jet black acrylic laquer, then a good few coats of clear over the top.
1987 Suzuki Mighty Boy - F5A, stocker.
Work fleet, or Wife's Jeep Rubicon.
Work fleet, or Wife's Jeep Rubicon.
https://www.facebook.com/media/set/?set ... db2f157135
Pics are here.
At some point I may sit down at a PC to be able to upload them as attachments.
Pics are here.
At some point I may sit down at a PC to be able to upload them as attachments.
1987 Suzuki Mighty Boy - F5A, stocker.
Work fleet, or Wife's Jeep Rubicon.
Work fleet, or Wife's Jeep Rubicon.
Mutter mutter mutter
Stuffed up the colour. Just about every error in actually painting it I think.
Live and learn, which is what this is about.
Will bring out the blaster and take the colour coat back off this weekend.
Looks kind of shmicko though, if you dont look closely. Pics uploaded
Stuffed up the colour. Just about every error in actually painting it I think.
Live and learn, which is what this is about.
Will bring out the blaster and take the colour coat back off this weekend.
Looks kind of shmicko though, if you dont look closely. Pics uploaded
- Attachments
-
- Already trying to smooth it out on the left.
Last edited by Breyten on Wed May 30, 2012 10:18 pm, edited 1 time in total.
1987 Suzuki Mighty Boy - F5A, stocker.
Work fleet, or Wife's Jeep Rubicon.
Work fleet, or Wife's Jeep Rubicon.
Got sunburnt Sat morning, no sandblasting just yet.
However, have found wheels that I like, just hoping they come in suitable specs (PCD and offset)
All the pics show a multi fit, so hoping it can come in the right PCD.
http://www.oxwheel.com.au/index.php/ind ... :pcd-4x100
However, have found wheels that I like, just hoping they come in suitable specs (PCD and offset)
All the pics show a multi fit, so hoping it can come in the right PCD.
http://www.oxwheel.com.au/index.php/ind ... :pcd-4x100
1987 Suzuki Mighty Boy - F5A, stocker.
Work fleet, or Wife's Jeep Rubicon.
Work fleet, or Wife's Jeep Rubicon.
Those wheels only come in 4x114.3 in a 15" fit. Wonder if that is the world trying to tell me something!
Also looked at some Watanabe types,which would be nice as driving set, possibly keep in 13" too, make use of the Maxxis MA-P1 tyres I have already.
Cooler weather in Perth this weekend, so will be trying to get more done.
I dont mind sweating it out normally, but sweat + garnet sand = pink mud all over.
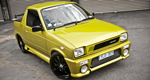
To give insight into my style sense, this is what I would love to be channeling into the MB.

Also looked at some Watanabe types,which would be nice as driving set, possibly keep in 13" too, make use of the Maxxis MA-P1 tyres I have already.
Cooler weather in Perth this weekend, so will be trying to get more done.
I dont mind sweating it out normally, but sweat + garnet sand = pink mud all over.
To give insight into my style sense, this is what I would love to be channeling into the MB.
1987 Suzuki Mighty Boy - F5A, stocker.
Work fleet, or Wife's Jeep Rubicon.
Work fleet, or Wife's Jeep Rubicon.
So couple of weekends ago we had a cool weekend, so I blasted the engine bay back to the spray putty.
I took the opportunity to fill the dimples and a few extra screw holes in the sides.
Since sanded and primered and another layer of spray putty.
Have an extra long weekend this week, so hoping to make some more headway.
thinking I should have removed the horn mounting bracket though.
Might slice that off before I proceed further.
- Attachments
-
-
-
Last edited by Breyten on Wed May 30, 2012 10:23 pm, edited 1 time in total.
1987 Suzuki Mighty Boy - F5A, stocker.
Work fleet, or Wife's Jeep Rubicon.
Work fleet, or Wife's Jeep Rubicon.
Links say that content is unavailable. Can you plz upload to the forum instead?
F8B EFI turbo - Three pots and a snail.
Back to painting the engine bay today.
In hindsight i should have just left it and paid someone.
Either my skills or the gear is not up to the task of doing it, plus all the different angles of the firewall.
I'll be happy if it comes out just as okay.
When the rest of the car gets done I'll see if its worth doing then, or later.
In hindsight i should have just left it and paid someone.
Either my skills or the gear is not up to the task of doing it, plus all the different angles of the firewall.
I'll be happy if it comes out just as okay.
When the rest of the car gets done I'll see if its worth doing then, or later.
- Attachments
-
- Car was veeeery dirty.
-
- Dont look closely!
Last edited by Breyten on Wed May 30, 2012 10:27 pm, edited 1 time in total.
1987 Suzuki Mighty Boy - F5A, stocker.
Work fleet, or Wife's Jeep Rubicon.
Work fleet, or Wife's Jeep Rubicon.
so, cleaned a few spots up and started fitting bits back into the engine bay. Ended up finishing with the gearbox and engine mated, and the engine back in the bay!
still needs aligningvand bolting up, but its there.
some pics attached.
the endless chain beats using an engine crane though. much smoother for lowering the gear back in.
still needs aligningvand bolting up, but its there.
some pics attached.
the endless chain beats using an engine crane though. much smoother for lowering the gear back in.
- Attachments
-
-
Last edited by Breyten on Wed May 30, 2012 10:27 pm, edited 1 time in total.
1987 Suzuki Mighty Boy - F5A, stocker.
Work fleet, or Wife's Jeep Rubicon.
Work fleet, or Wife's Jeep Rubicon.
Thats not clean.  Clean is clean enough to eat from.
Cleaned up a bit though.
Putting the F5 back in to get the car running again. Then I can get more smaller things done and work on building up a new motor. Easier to take time if it can still be used.
Cleaned up a bit though.
Putting the F5 back in to get the car running again. Then I can get more smaller things done and work on building up a new motor. Easier to take time if it can still be used.
1987 Suzuki Mighty Boy - F5A, stocker.
Work fleet, or Wife's Jeep Rubicon.
Work fleet, or Wife's Jeep Rubicon.