Arklans electric hatch

Browse through a range of Suzuki projects (NO tech questions here!)
User avatar
arklan
Posts: 392
Joined: Fri Oct 14, 2011 1:31 am

ok so i have a couple of blurry pictures...
20140519_203331780960865_zps60cbbf9c[1].jpg
http://i71.photobucket.com/albums/i148/ ... 5ecb9c.jpg
http://i71.photobucket.com/albums/i148/ ... d95ae8.jpg

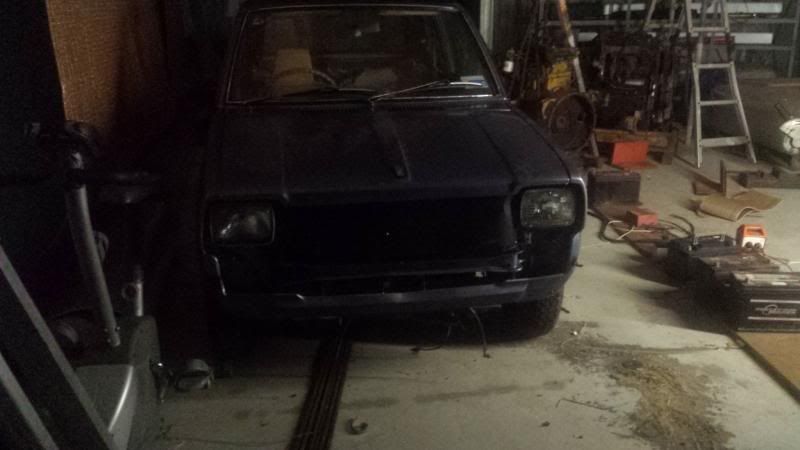
right so, got this hatch here, it was converted to electric and registered as an electric car for a while until the batteries died. then the person got rid of it and evworks bought it. they stripped it out to redo everything and put lithium batteries instead of lead acid and i came along, so now i have it.

most of the mechanical stuff is already done, its all the electrical stuff.
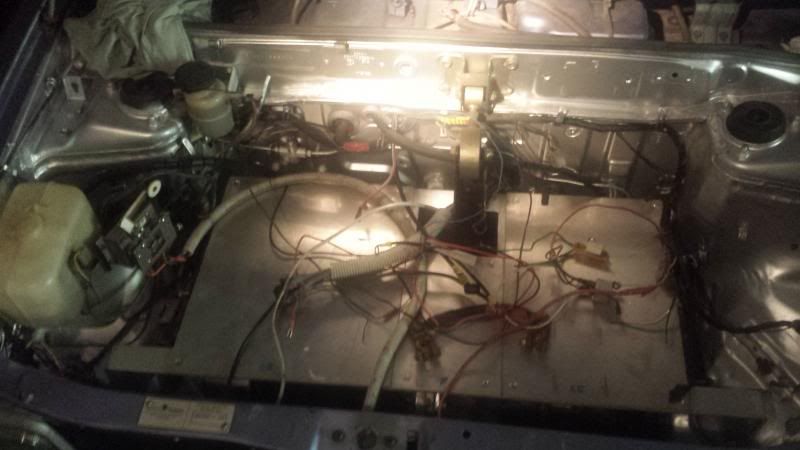
the loom in the engine bay is half stock half birds nest and im a little out of my depth, i have a detailed wiring diagram and i want to get all the 12v back to normal before i start getting excited with anything else.

so yeah watch this space
Bear351c
Posts: 58
Joined: Sun Aug 19, 2012 7:50 pm
Location: Gawler, South Oz.

Wow ! Now this looks interesting. Car looks in good nick, especially the engine bay.
Watching and waiting...... :)
User avatar
arklan
Posts: 392
Joined: Fri Oct 14, 2011 1:31 am

ok so i hooked a battery up to the battery wire and alternator wire and had all the indicators, lights etc working and than fan inside the car.

when i turn the key theres an orange light that comes on, theres nothing written with and no icons or whatever, my phone is playing games at the moment so heres a picture from google with the light circled..
in this pic it looks like it should be a red colour and the icon looks like the oil pressure light<br />in my 83 hatch its bright orange tho and no icon :/
in this pic it looks like it should be a red colour and the icon looks like the oil pressure light
in my 83 hatch its bright orange tho and no icon :/
ok so another question, the alternator wire has the main thick wire that goes to the alternator with the hoop connection and then theres a clip with 3 not so thick wires.
what do these do?
looking at the wiring diagram isnt helpful in this :/
User avatar
arklan
Posts: 392
Joined: Fri Oct 14, 2011 1:31 am

ok so i was in bali for 2 weeks but heres an update.
i went through the wiring diagram and a test light and have traced all of the 12v wiring. most of them were wires that i didnt need so iv just tied them up until i figure out what to do with them, engine bay is much tidier now.

iv bolted in the motor controller, dc converter and main contactor so 99% of stuff is physically attached to the car, its just connecting all the wiring and finding some batteries now.

iv got 4 600cca car batteries that ill use to test, but im going to need 10 of them to run the car at its normal voltage of 120v or else i wont be going fast :p

pics to follow when it warms up enough for my bum to become unstuck to the seat
User avatar
arklan
Posts: 392
Joined: Fri Oct 14, 2011 1:31 am

engine bay with some parts attached
Attachments
20140613_204317437280901.jpg
User avatar
arklan
Posts: 392
Joined: Fri Oct 14, 2011 1:31 am

ok so I found that light in the dash is to let me know the car is on which is handy because I was just starting to make a light to do that

the car is now 100% done electrically
I have 4 car batteries which I connected to it for 48v and everything came on except the motor conyroller
its voltage range is 72 -120 but I thought maybe id get something from 48 :p
my dad is gonna bring some batteries back from the farm so I can see if its working..

next is the interior
since most of the work was already done mechanically there wasnt any build pictures but there should be some stuff to show from now on!

and now for some pictures
Attachments
20140618_2018441761460595.jpg
User avatar
arklan
Posts: 392
Joined: Fri Oct 14, 2011 1:31 am

pictures
Attachments
20140623_0029131169236809.jpg
20140622_2333581256171793.jpg
20140622_194600-51524929.jpg
20140622_194522354423987.jpg
20140622_194507(0)1929426260.jpg
User avatar
arklan
Posts: 392
Joined: Fri Oct 14, 2011 1:31 am

more pictures
Attachments
20140624_1631031126685790.jpg
20140623_2257072046173160.jpg
20140623_223442843593791.jpg
20140623_223521-1935203767.jpg
20140623_203159-1373464827.jpg
User avatar
arklan
Posts: 392
Joined: Fri Oct 14, 2011 1:31 am

more pics of the interior
the blue grass has actually come up bettrr than I expected, u can see the dash mat and the side pieces in the back
dash mat is attached with velcro, velcro is attached with tarzans grip/super glue
there will be another floor mat when I get the batteries sorted, decided to to bite the bullet and get lithiums

that said I rang up shannons to get an insurance quote and at first they quoted me about 1050 to insure for 12k
after telling them id drive it twice a week they reduced it to about 650
I would drive it every day but only for 15 mins max each day so I think it works out
someone who drives their brock commodore only on weekends is probably gonna drive it for hours and drive it a lot harder than I will with my 12kw's

dad loaned me a bunch of batteries and I was able to drive it around a bit, no problems going up hill but reverse is quite jerky, forwards is super smooth and ninja silent
engine bay is much tidier now with everythinh in place, will have to get a plastic cover to shroud the bits in thr middle where some knob might go and stick his fingers in there

brakes r hanging on a bit but the car hasnt been driven in a long time so they probably just need to be driven a bit
Attachments
20140629_2249591754135336.jpg
20140629_224802159271633.jpg
20140630_1634351597922486.jpg
20140630_163509-1469154278.jpg
User avatar
rf4burns
Posts: 162
Joined: Fri Sep 03, 2010 7:26 pm
Location: Central QLD

Nice work 8) ...bit surprised that there are not more EV conversions. The first Australian EV manufacture has gone (Google - Blade EV to see but at 48K its probably no wonder)
Get with it ,Get over it ,Get on with it .....OR LEAVE
User avatar
arklan
Posts: 392
Joined: Fri Oct 14, 2011 1:31 am

the new and much tidier engine bay

the amount of crap that was in here looked like it would take me months to figure out, but in the end it was mostly just a real complicated fuel gauge which i got rid of, it had 6 wires coming out
the new one is a toroidal type with just 1 wire and it sits in the back
one day ill have to clear up all those unused wires going to where the battery used to be but for now its good enough
Attachments
20140810_125648.jpg
User avatar
rf4burns
Posts: 162
Joined: Fri Sep 03, 2010 7:26 pm
Location: Central QLD

Hey Nice work :) ; can you tell us a bit more about it?; what sort of range are you getting? recharge time? is it a D.C motor or AC using inverter? (one of your earlier post mentions a DC convertor but is this just a DC pulse controller?)of course the all important, top speed?
Get with it ,Get over it ,Get on with it .....OR LEAVE
User avatar
arklan
Posts: 392
Joined: Fri Oct 14, 2011 1:31 am

general rule of thumb for range is the weight of the car in pounds divided by 10 = watt hours per mile
its pretty accurate unless your at the track

so my car is 2000lbs so 200wh per mile
my battery pack is 144v 100ah so thats 14.4kwh
14400 / 200 = 72miles 115km range to 100%depth of discharge
its really bad for lithiums to go lower than 80% so about 95km is max range

batteries cost 6000 and will last 10-15 years
so 600 a year
the amount of money I spend on petrol a year in the daewoo mighty boy is about 400 a year
but if I wanted to travel 90km every day for 10 years I could do that for 600 a year
ill have to find somewhere thats 45km away and drive there every day

this hatch has upgraded suspension from when it was carrying around all that lead, mod plated to 1040gvm from 840gvm
and with no back seat theres a huge cargo area, good thing plastic grass is hard wearing because I think its gonna be carrying some shit :)

this is my thread on diyelectriccar
its mostly just asking dumb questions but theres a lot more information on that site
http://www.diyelectriccar.com/forums/sh ... 96900.html
User avatar
arklan
Posts: 392
Joined: Fri Oct 14, 2011 1:31 am

saw this dumped on the side of a road with a condemned sticker on it
20140829_113241702022086.jpg
I thought the wheels would be great
20140829_1130141063691793.jpg
but the stud pattern is 4inch :/
User avatar
Tez
Posts: 1176
Joined: Wed Sep 03, 2008 9:38 pm
Location: Croydon, Vic

That's amazing that a Hyundai's wheels are imperial.
I would have bet money they would have been metric.
Tez
So the adventure continues...
Post Reply