Project: you want to do WHAT !!!!

Browse through a range of Suzuki projects (NO tech questions here!)
Post Reply
User avatar
pegusas1969
Posts: 68
Joined: Fri Aug 16, 2013 8:21 am
Location: brisbane

hi every one,
I thought it was time for me to start a topic for my project.

all my family and friends reckon I'am nuts but I don't care.
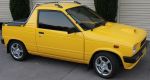
my boy started as this.
First Photo.jpg
First thing I done was remove the canopy and replace the rails. I thought that it ruined the look of the Boy.

Second job was replacing the stupid 70's Style mirror that the previous owner put on.
Horrible Mirrors.jpg
Proper Mirror.jpg
Third Job was the change the wheels. I had a Mitsubishi cordia which I drove from darwin to brisbane. once here my wife decided that we needed a larger car as we just had a baby. I sold the car as scrap but kept the tyres and rims. they sat around the house for the last ten years but they were a perfect fit for the Boy. the only thing i needed to do was use a 5mm spacer on the back tyres as they rubbed on be bump stop mount.
Cordia Mags.jpg
Cordia Mags.jpg (28.56 KiB) Viewed 7468 times
I had them powder coated as the original paint job was not suitable.

Fourth Job was the seats.
the original seats I thought were beyond repair so I spent ages searching for suitable replacements.
I ended up using a set of seats from a early 2000 Mazda 323 Astina sport.
the only thing I needed to do was make a a box section to put on the inside rail as it sit higher and a bit wider that the Mighty boy seats. I have sit used the mighty boy rails so the seat still moves correctly.
replacement seats.jpg
I will remove the seats and take photos of the rail and post later.
If near enough was good life would be boring.
Ya Hya Chouhada
User avatar
Brayden
Posts: 9101
Joined: Sun Apr 11, 2004 3:09 am
Location: Canberra ACT
Contact:

So where is the 'nuts' part of the project? :P Sounds pretty normal to me!
Keep up the good work. :thumbup1:
F8B EFI turbo - Three pots and a snail.
User avatar
pegusas1969
Posts: 68
Joined: Fri Aug 16, 2013 8:21 am
Location: brisbane

the fifth job is the most ambitious yet.
the car had a canopy which I got rid of, it also had the press studs for a tonneau cover which I have removed and patched up.
I wanted something different to make it stand out and finally decided on a roller cover.

It still a work in progress but here is what I have done so far.

I started with the roller shutter from an old cigarette display I bought for $40 which was pretty bad shape but I only wanted the shutters and rails.
I was going to use a wiper motor to operate the shutter but I realised that I couldn't fit the drive shaft properly.
When searching the wreckers for something better I remembered that I had seen some small motors on a ford fairlane seat.
seat adjustment motor
Once I cut a couple of aluminium disc to use as spacers I glued and pinned them to the drive shafts of the two motors.
right side motor
right side motor
I made some brackets to attach it to the car.
left side bracket
left side bracket
_DSC8374.JPG (60.54 KiB) Viewed 7449 times
left side inside bracing
here is a picture of the shutter attached to the car.(please excuse the mess in the tray)
test fit shutter to car
next part is the surround to cover the rest of the tray.
tray cover
tray cover
supervisor checking my work
hole has been cut out of the template.
template hole cut out
That is the how much I have done so far.
If near enough was good life would be boring.
Ya Hya Chouhada
User avatar
CHR15 N
Posts: 308
Joined: Sat Jul 24, 2004 3:14 pm
Location: NSW Sydney

Yeah wow. I have never seen a roller shutter on the tray before. Nice one!
User avatar
pegusas1969
Posts: 68
Joined: Fri Aug 16, 2013 8:21 am
Location: brisbane

hi again,
I hope someone can help.

I have two F8B motors One from a 1988 Alto, the other was from some else (Not Sure as I purchased it out of the car).

once i cleaned the motors I have noticed that they have different sumps
sump 1 out of the Alto
sump 2 unsure what it is out of
can anyone tell me what and why the difference is

the sump 2 motor is probably the one i was thinking of using as it appears to be the cleaner of the two when I remover the rocker cover. I'am thinking of attaching the fly wheel and gearbox with the start motor to each to do a compression test.

I done the test on my F5A and I got 140/ 135/ 140 psi. I didn't do the wet test yet. is that compression okay as I wont be doing the engine swap over for a while.
If near enough was good life would be boring.
Ya Hya Chouhada
User avatar
Brayden
Posts: 9101
Joined: Sun Apr 11, 2004 3:09 am
Location: Canberra ACT
Contact:

The only practical difference between the sumps is that the Alto has the drain plug on the rear, which makes it a bit more painful to access.

Service limit for compression is about 140psi, so your F5A will be getting pretty lazy. A fresh motor has about 190psi.
F8B EFI turbo - Three pots and a snail.
User avatar
pegusas1969
Posts: 68
Joined: Fri Aug 16, 2013 8:21 am
Location: brisbane

hi guys and girls,
i need some advice.
iam looking at putting the alto dash with some changes I want to do into my boy.
can anyone tell me if it will fit. i haven't taken out the old one yet but i think it pretty close.

i haven't done much on the rear tray as i decided to swap the the steel top i was going to use for aluminium but i waiting for a mate to do the welding.
Attachments
_DSC9591.JPG
If near enough was good life would be boring.
Ya Hya Chouhada
User avatar
Brayden
Posts: 9101
Joined: Sun Apr 11, 2004 3:09 am
Location: Canberra ACT
Contact:

Yes, it will fit if you make up/modify a couple of brackets. The column shroud also requires some work.
I doubt there will be enough space between the floor and dash for the console you've made.
F8B EFI turbo - Three pots and a snail.
User avatar
pegusas1969
Posts: 68
Joined: Fri Aug 16, 2013 8:21 am
Location: brisbane

thanks for the warning on the centre console Brayden. I have taken out the dash and fitted the atlo dash and test fitted the centre console and you were right(damn it).
test fitting dash
test fitting dash
i have made a centre console that fits around the gear stick.
centre console with gauges
If near enough was good life would be boring.
Ya Hya Chouhada
User avatar
pegusas1969
Posts: 68
Joined: Fri Aug 16, 2013 8:21 am
Location: brisbane

seat mounting
seat mounting
i have removed the passenger seat and i have a photo of the block I had to attach to the seat to make the standard rails to fit.

the next item was mounting a rear wing/sunshade.

the cut outs in the centre and sides are the the rails which i wanted the keep.
the hole in the centre is for the gps antenna that's part of the stereo system I am putting in the boy
Attachments
rear wing/sun shade
rear wing/sun shade
If near enough was good life would be boring.
Ya Hya Chouhada
Post Reply