Thanks Brayden, it is a bit out of left field.
The fuel system gave us the most heartache of all the things we had to deal with.
We tried to use the Matiz fuel tank but it just wasn’t going to fit. We needed to use the Matiz fuel pump, gauge and FPR (all contained in one unit) for everything to talk to one and other and work.
We ended up using the MightyBoy fuel tank, after cleaning and patching it with POR15, with a 5litre surge tank mounted behind it. Into the surge tank we installed the fuel pump unit and fed fuel to it from the original MightyBoy drain hole in the tank.
This hasn’t been perfect but we’re confident we will get it all working as it should. Currently the fuel gauge works when it wants and we suspect the float has jammed against side of the surge tank, so a little investigation is needed.
Early in the piece we thought a tacho would be nice but not an add-on rather in the dash like any nice car. A little research showed some Matiz’s were fitted with a tacho in Romania but trying to get one proved a bit difficult. More searching found the Chery QQ has a nice looking dash, so a bit of Googling and I ordered one from China and a matching electronic speed transducer.
To install this dash means I need to re-pin the loom in that area but it looks do-able. The Chery dash fastened in the same way as a Matiz, after all the QQ is a clone of the Matiz and has been a subject of a Court Case in China for copyright infringement.
We'll post up if we ever get around to installing it.
We solved the bonnet hinges issue by folding up some 3mm stainless so it would bolt to the bonnet and it has a leg that runs between the scuttle and guard that hinges on a 6mm bolt in a rivnut insert in the side of the scuttle.
Once we had what looked like a car that would function we blew it apart for paint. This is where it became interesting. The car needed something different in the way of paint and we went back and forth quite a few times between Gulf Wyer colours and Martini Racing colours. We already had a real Martini car and thought another was a bit silly but Lachlan pointed out we once had a 911 Porsche in Martin Colours (without the light and dark blue stripes) so he got his way.

After painting the car a base white we spent a day and half masking it up and painting the unmasked area dark blue. We then masked the dark blue and painted the light blue. Lastly we masked that up and painted the red stripes. Lots of work but it does look good.

The wiring was done in a few hours as the Matiz loom fitted where it did originally and all the holes in the firewall were in the right place. We needed to extend the wiper motor wiring, as it was now inside the car rather than under the bonnet and delete the rear door curtesy light wiring, Rear window demister and wiper, but that’s about it. Factory wiring is so much easier than what you do yourself.
Upgraded (new) headlights with 90/130 Halogen bulbs means you can see past your nose. We would like to upgrade the taillight to LED as they are pretty feeble.
Once this was done we trimmed the interior in two variations of grey vinyl so that all interior metalwork was trimmed. We then installed the rear window then the carpet out of the Matiz. This fitted the floor perfectly as all seat mounts etc. were left stock Matiz. We used the Matiz seat belts as they activated the seatbelt warning light on the dash.
The seats are from a Nissan S13 and whilst tight they work well and are very comfortable. The steering wheel is a Sparco one we picked up for $100.00. Actually the wheel has a bit of a story attached to it. One day whilst working on the car a young bloke rocked in and said “Wow a MightyBoy, I used to have one” and he left his number in case we needed any machining done as our lathe isn’t the most modern or accurate, but neither am I. Anyway Lachlan spotted the Sparco for sale and agreed a price. When we went to collect it the seller was none other than the young guy who wandered into our garage. A small world!
We re-installed all the mechanicals and fired it up and test drove it in the garage. We have a Highway Patrol Officer living 100metres away so no quick lap of the block! We’ve already had words with this slime-bag. One issue we had was we couldn’t get it to give spark or fuel pressure. We searched for a day but couldn’t find a blown fuse, plug disconnected or any reason for the problem. Our OBDII scanner wouldn’t talk to the car and we finally surmised there was something wrong with the ECU. Close inspection revealed it wasn’t even plugged in! Once that was rectified the little car sprang into life.
We loaded the car on the trailer and took it to a Relatives acreage and test drove it on their driveway. All went well except the steering is a bit “clunky” which we’ve ascertained is caused by moving the dash back and down. It has put joint of the first UJ in the steering at a horrible angle and it changes the way it rotates. More research into how to fix is an on-going issue.
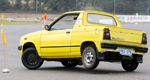
One issue with taking the car anywhere is everyone looks and it gets plenty of people taking its photo.
 We had the car Engineered in Queanbyan than took it for its Blue Slip locally. The car failed as it was leaking plenty of oil. We took of the sump and re-sealed that and also the cam cover wasn’t quite tight enough. Once that was done it passed and received rego on the 18th January.

Distinctive if nothing else.
Here is a shot of the almost finished interior. Somewhat different to what you expect to see in a MightyBoy! The dash rubs against the passenger's door so we may insert spacers behind the hinges to give it a bit of clearance.
 So 11 months from go to whoa, but in that time I have been intestate 5 times and overseas twice so we figure we worked on it for around 8 months, probably 3 days a week. We guess around 1,000 man-hours went into it.
So what did this cost us? I figure we got out of it for less than $4,500.00 with Engineering and we have a fairly unique MightyBoy that drives like a 15 year old car not a 30 year old car.
During the build we installed a new cam belt, clutch spark plugs, leads, cap and rotor. So it should be good for quite awhile
At the end of the day we did everything bar install the windscreen (could have done that but it cost the same installed or uninstalled) and buff the paint when it was finished.
I can post up more random photos f the build if anyone is interested.